Head Start @Home
With the current prescribed Massachusetts Department of Early Education and Care health and safety regulations it is not feasible, at this time, to physically open all of our Head Start and Early Head Start centers and classrooms. Part day/school year preschool and our part day/full year infant toddler classrooms will be offered via a remote learning program option for the 2020-2021 school year.
For more information or to apply call 413-417-7779 or fill out an application here. Our remote learning options will include Class Dojo, an on-line program designed to connect teachers and support staff with families. Every classroom will have their own Class Dojo that is set up by the Teacher Director. Parents will be invited to join via email. Families will be expected to participate participate…[read more]
Check out our at-home activities!
We’ve got plenty of ideas to inspire you and your children during the year, both indoors and outdoors.
Ice Melting: Put an ice cube outside in a cup and talk about what you think will happen. Observe the ice cube over time and talk about or have your child draw the changes.
Derretimiento del hielo: coloque un cubo de hielo en una taza y hable sobre lo que cree que sucederá. Observe el cubo de hielo a lo largo del tiempo y hable sobre los cambios o pídale a su hijo que dibuje.
Water Play: Have 2 buckets of water and some materials in each bucket for children to explore the water and move the water back and forth from one bucket to the other. Some materials you could use are sponges, cups, spoons or turkey basters.
Juego de agua: Tenga 2 baldes de agua y algunos materiales en cada balde para que los niños exploren el agua y muevan el agua de un balde al otro. Algunos materiales que puede utilizar son esponjas, tazas, cucharas o basters para pavo.
Math game with sidewalk chalk– Draw shapes circle, triangle, square, and rectangle. With chalk on the side walk. Call out a shape and ask your child to find the shape and jump inside. To make it more challenging, put numbers in the shape and have your child find the correct number and count.
Juego de matemáticas con tiza para acera: dibuja formas de círculo, triángulo, cuadrado y rectángulo. Con tiza en la acera. Diga una forma y pídale a su hijo que la encuentre y salte adentro. Para hacerlo más desafiante, coloque números en la forma y haga que su hijo encuentre el número correcto y cuente.
Make frozen juice pop treats to enjoy outside – Pour your favorite juice in an ice cube tray, add plastic wrap over the ice cube tray (so the popsicle sticks will freeze in place), add popsicle sticks through the plastic. Place tray in freezer overnight. Once the juice is frozen, remove the plastic wrap and enjoy!
Haga golosinas de paletas de jugo congeladas para disfrutar al aire libre: vierta su jugo favorito en una bandeja de cubitos de hielo, agregue una envoltura de plástico sobre la bandeja de cubitos de hielo (para que los palitos de paleta se congelen en su lugar), agregue palitos de paleta a través del plástico. Una vez que el jugo esté congelado, retire la envoltura de plástico y ¡disfrute!
Go on a bug hunt! Grab a magnifying glass to get a closer look at what you find outside. Keep a notebook and pencil handy so you can draw a picture of all the different types of bugs you find. Be careful not to touch the bugs, just look with your magnifying glass! After you’re done, count how many bugs you saw!
¡Vaya a la búsqueda de insectos! Coge una lupa para ver más de cerca lo que encuentras. Tenga a mano un cuaderno y un lápiz para que pueda hacer un dibujo de todos los diferentes tipos de insectos que encuentre. Tenga cuidado de no tocar los insectos, ¡solo mire con su lupa! Una vez que haya terminado, cuente cuántos insectos vio.
Hop, jump, and get moving! Set up two or more colors of paper plates outside. Have your child add colors to the plates by using writing tools like crayons, colored pencils or markers. Place the plates side by side or in line and have your child jump from one plate to the next. Ask questions about what color comes next, encourage your child to jump on one particular color plate by jumping on top of the paper plates.
¡Salta, salta y muévete! Coloque dos o más colores de platos de papel afuera. Haga que su hijo agregue colores a los platos usando herramientas de escritura como crayones, lápices de colores o marcadores. Coloque los platos uno al lado del otro o en línea y haga que su hijo salte de un plato al siguiente. Haga preguntas sobre qué color viene después, anime a su hijo a saltar sobre un plato de un color en particular saltando sobre los platos de papel.
During daily routines such as getting dressed, eating or bathing, talk about the order in which things happen. See if your child can tell you what is going to come next. Make this one silly by skipping parts of the routine to see what happens. For example, at meal time, prepare the table but skip putting food on the plate and sit down to eat or washing hands, skip turning the water on and talk about what happens when you skip parts of the routine.
Durante las rutinas diarias, como vestirse, comer o bañarse, hable sobre el orden en que suceden las cosas. Vea si su hijo puede decirle lo que vendrá después. Haz que esto sea tonto saltándote partes de la rutina para ver qué sucede. Por ejemplo, a la hora de la comida, prepare la mesa pero omita poner comida en el plato y siéntese a comer o lavarse las manos, evite abrir el agua y hable sobre lo que sucede cuando omite partes de la rutina.
Hop to it: After breakfast, have children hop or skip to the bathroom to brush their teeth. If they are hopping on one foot, make sure they switch legs on the way back. This is great for leg strength, foot quickness and balance
Salte a él: después del desayuno, haga que los niños salten o salten al baño para cepillarse los dientes. Si está saltando sobre un pie, asegúrese de que cambie de pierna en el camino de regreso. Esto es ideal para la fuerza de las piernas, la rapidez del pie y el equilibrio.
Create a daily schedule using your own pictures or cut out some pictures. Create a schedule on how your daily routine will look like with your child. Talk to your child using the daily schedule with visuals about what comes next. Use phrases like first we will brush our teeth and then we will get dressed. Provide your child with choices throughout the day to pick from activities.
Crea un horario diario usando tus propias imágenes o recorta algunas imágenes. Cree un horario sobre cómo se verá su rutina diaria con su hijo. Hable con su hijo usando el horario diario con imágenes sobre lo que viene a continuación. Usa frases como primero nos cepillaremos los dientes y luego nos vestiremos. Proporcione a su hijo opciones a lo largo del día para elegir actividades.
Bed time story: Have your child pick a story for bed time every night. Read the story together and expand their thinking by asking questions from the pictures. Point and talk about the pictures and the words from the book. The next day have your child read the story to you by looking at the pictures.
Cuento para la hora de dormir: haga que su hijo elija un cuento para la hora de dormir todas las noches. Lean juntos la historia y amplíen su pensamiento haciendo preguntas a partir de las imágenes. Señale y hable sobre las imágenes y las palabras del libro. Al día siguiente, pídale a su hijo que le lea la historia mirando las imágenes.
Take the beach to the bathtub! Enjoy scooping and pouring water with sand toys! See if you can catch plastic fish with a net. Add a small beach ball and enjoy!
¡Lleva la playa a la bañera! ¡Disfruta de sacar y verter agua con juguetes de arena! Vea si puede atrapar peces de plástico con una neta. ¡Agrega una pequeña pelota de playa y disfruta!
When eating with your child, play the “I Can Find” game! Think of different foods or utensils that you can describe and have them guess! “Can you find something that is small and round?” “Can you find something that is soft?” Encourage them to ask you similar questions to find!
¡Cuando coma con su hijo, juegue el juego “Puedo encontrar”! ¡Piense en diferentes alimentos o utensilios que pueda describir y haga que adivinen! “¿Puedes encontrar algo que sea pequeño y redondo?” “¿Puedes encontrar algo que sea suave?” ¡Anímelos a que le hagan preguntas similares para encontrar!
Look around the house and have your child find the letters in their name. Give them paper and pencil so they can write the letter each time they find it and keep track how many times they were able to find each letter.
Mire alrededor de la casa y pídale a su hijo que busque las letras de su nombre. Déles papel y lápiz para que puedan escribir la letra cada vez que la encuentren y hagan un seguimiento de cuántas veces pudieron encontrar cada letra.
Write one letter on each Popsicle stick until you’ve done all 26 letters of the alphabet. Write the word “Kaboom!” on six additional Popsicle sticks, and place them all in a cup with the letters facing down. Have your child pull out one stick at a time, reading the letter or making the sound of each one. If they pull a “Kaboom!” stick, they have to put all of their sticks back in the cup and start again.
Escribe una letra en cada palito de paleta hasta que hayas terminado las 26 letras del alfabeto. Escribe la palabra “¡Kaboom!” en seis palitos de paleta adicionales y colóquelos todos en una taza con las letras hacia abajo. Haga que su hijo saque un palo a la vez, leyendo la letra o haciendo el sonido de cada uno. Si sacan un “¡Kaboom!” palo, tienen que volver a poner todos sus palos en la taza y empezar de nuevo.
Outdoor Library: Take your favorite children’s storybooks outside with a blanket and enjoy relaxing on the blanket reading or looking at the pictures together in the summer sunshine.
Biblioteca al aire libre: lleve sus libros de cuentos favoritos para niños al aire libre con una manta y disfrute relajándose en la manta leyendo o mirando las imágenes juntos bajo el sol del verano.
Rock Letters: Use sidewalk chalk to write letters on the sidewalk or pavement. Find rocks to outline the letters! See what other objects you can find the trace the letters!
Letras de rocas: use tiza de acera para escribir letras en la acera o en el pavimento. ¡Encuentra rocas para delinear las letras! ¡Mira qué otros objetos puedes encontrar para trazar las letras!
Beginning sounds: Use cereal boxes, signs or stores labels. Point to words that start with the same beginning sound. Ex. Point to the letter “M” encourage your child to listen carefully to the sound the letter M makes. Give examples to your child for beginning sounds like mom and milk start with the same beginning sound. Help your child to look for words that start with the same beginning sound. Ask questions and wait for your child to think, listen to your child’s thoughts. Use paper or write with chalk on a sidewalk.
Sonidos iniciales: use cajas de cereales, carteles o etiquetas de tiendas. Señale las palabras que comienzan con el mismo sonido inicial. Ex. Señale la letra “M” y anime a su hijo a que escuche con atención el sonido que hace la letra M. Déle a su hijo ejemplos de sonidos iniciales como mamá y mano que comienzan con el mismo sonido inicial. Ayude a su hijo a buscar palabras que comiencen con el mismo sonido inicial. Haga preguntas y espere a que su hijo piense, escuche las ideas de su hijo. Use papel o escriba con tiza en una acera.
Writing around the house: Using a dry erase board with markers. Ask your child to write words from around the house. Some examples include kitchen labels, mail, signs, books, magazines, game boxes. Be creative and fun!
Escribir en la casa: usar una pizarra de borrado en seco con marcadores. Pídale a su hijo que escriba palabras de la casa. Algunos ejemplos incluyen etiquetas de cocina, correo, letreros, libros, revistas, cajas de juegos. ¡Sea creativo y divertido!
MEXICAN CHICKEN SALAD
Source: Chopchopfamily.org
Even though we call this a chicken salad, you could omit the chicken and substitute with a can of beans (drained and rinsed) to make a very delicious — and very different — salad.
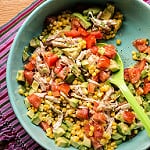
INGREDIENTS
2 cups leftover diced or shredded chicken (2–3 pieces, depending on the size) *
2 medium tomatoes, diced
2 ripe avocados, peeled, pitted, and diced
1 cup corn kernels, either frozen and thawed or cut from a leftover boiled, steamed, or grilled cob
2 scallions, greens and whites, chopped or 2 tablespoons chopped red onion
3 tablespoon olive oil
2 tablespoon fresh lime juice (from 1 juicy lime)
Salt and black pepper
INSTRUCTIONS
Wash your hands with soap and water, then gather all your equipment and ingredients and put them on a counter.
• Put all the ingredients in the bowl and mix gently.
• Add salt and pepper to taste.
• Serve right away, or cover and refrigerate up to 2 hours.
* The chicken can be roasted, poached, or grilled — or use a rotisserie chicken from the supermarket. To shred, use your hands, or two forks, to pull the meat apart in opposite directions.
ENSALADA MEXICANA DE POLLO
Aunque llamamos a esta ensalada de pollo, tú puedes saltarte el pollo y sustituir con una lata de frijoles (drenados y enjuagados) para hacer una muy deliciosa, y muy diferente ensalada.
INGREDIENTS
2 * tazas de pollo sobrante cortado en cubos o deshebrado (2-3 piezas, dependiendo del tamaño)
2 tomates medianos, cortados en cubos
2 aguacates maduros, pelados, sin hueso y cortados en cubos (este es trabajo para un adulto)
1 taza de granos de elote, ya sea congelados y descongelados previamente o cortados de una mazorca sobrante, hervida al vapor o a
2 cebolletas, partes verdes y blancas, picadas o 2 cucharadas de cebolla morada picada
3 cucharadas de aceite de oliva
2 cucharadas de jugo fresco de limón (de 1 limón jugoso)
Sal y pimienta negra
INSTRUCTIONS
• Pon todos los ingredientes dentro del tazón y mezcla ligeramente.
• Agrega sal y pimienta al gusto.
• Sirve inmediatamente o cubre y refrigera hasta 2 horas.
*El pollo puede ser rostizado, pochado o asado; o utiliza un pollo rostizado del supermercado. Para deshebrar, utiliza tus manos, o dos tenedores, para separar la carne en direcciones opuestas.
MACARONI & CHEESE WITH BROCCOLI
Source: Umass Extension Nutrition Education Program
Serves: 8
Fruits and Vegetables: ¼ cup per serving
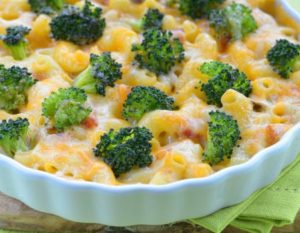 INGREDIENTS
2 cups whole-wheat elbow pasta, uncooked
4 tablespoons flour
2 cups milk, low-fat or fat-free
2 cups cheddar cheese, reduced-fat, shredded
½ teaspoon pepper, ground
2 cups cooked broccoli, chopped
DIRECTIONS
• Cook pasta until tender following directions on package.
• Drain cooked pasta and return to pan. Sprinkle flour over pasta while it is still warm. Toss thoroughly.
• Reheat the pan to medium heat, slowly stir in milk, cheese, and pepper.
• Cook, but do not boil, until the milk and cheese thicken into a creamy sauce—approximately 7 -10 minutes.
• Stir in broccoli and heat thoroughly.
Tip: Substitute another favorite vegetable for broccoli.
Nutrition Facts
Serving size: about 1 cup; Calories: 200; Carbohydrates: 29 g; Fiber: 1 g; Fat: 3.5 g; Saturated fat: 2 g; Sodium: 290 mg
MACARRONES CON QUESO Y BROCOLI
Porciones: 8
Frutas y vegetales: ¼ taza por porción
INGREDIENTES
2 tazas de pasta de macarrones integral, crudos
4 cucharadas de harina
2 tazas de leche, bajo en grasa o libre de grasa
2 tazas de queso cheddar, reducido de grasa, rallado
½ cucharadita de pimienta, molida
2 tazas de brócoli cocido, picado
INSTRUCCIONES
• Cocine la pasta, hasta que esté tierna, de acuerdo a las instrucciones en el paquete.
• Escurra la pasta corrida y devuélvala al sartén. Espolvoree con harina sobre la pasta antes de que enfríe. Revuelva bien.
• Recaliente el sartén a fuego medio, introduzca y revuelva lentamente la leche, queso y pimienta.
• Cocine, pero no hierva, hasta que la leche y el queso se conviertan en una salsa cremosa— aproximadamente 7–10 minutos.
• Introduzca y revuelva el brócoli y caliente bien.
Consejo: Use otro vegetal favorito en vez de broccoli.
Información nutricional
Tamaño de la porción: aprox. 1 taza; Calorías: 200; Carbohidratos: 29 g; Fibra: 1 g; Grasas: 3.5 g; Grasa saturada: 2 g; Sodio: 290 mg
EASY EGG SANDWICH
Source: UMass Extension Nutrition Education Program
Watch Video!
Serves: 1
Fruits and Vegetables: ¼ cup per serving
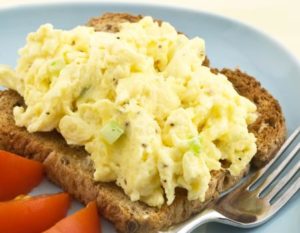 INGREDIENTS
2 eggs, large
1 slice whole-wheat bread or 1 whole-wheat tortilla (6-inch)
1 tablespoon cheddar cheese, low-fat, shredded
1 tomato, sliced
DIRECTIONS
• Wash and slice tomato.
• Beat eggs in microwave-safe bowl using a fork.
• Cook eggs in microwave for 45-60 seconds. Take out and stir. Place back in microwave for 30 more seconds. When done, eggs should be fluffy, not runny.
• Spread cooked eggs on bread or tortilla and top with cheese and tomato slices.
• Serve this “face-up” sandwich warm.
Tip: Eggs are an inexpensive, healthy source of protein.
Nutrition Facts
Serving size (with whole-wheat bread): 1 sandwich; Calories: 230; Carbohydrates: 16 g; Fiber: 0 g; Fat: 11 g; Saturated Fat: 3.5 g; Sodium: 320 mg
SÁNDWICH FÁCIL DE HUEVO
Source: UMass Extension Nutrition Education Program
Watch Video!
Porciones: 1
Frutas y vegetales: ¼ taza por porción
INGREDIENTES
2 huevos, grandes
1 rebanada de pan integral o 1 tortilla integral (6 pulgadas)
1 cucharada queso cheddar, descremado, triturado
1 tomate, rebanadas
INSTRUCCIONES
• Lave y rebane el tomate.
• Bata los huevos con un tenedor en un cuenco para microondas.
• Cocine los huevos en el microondas por 45-60 segundos. Remueva y agite. Coloque de nuevo en el microondas y cocine 30 segundos más. Al acabar, los huevos deben estar esponjosos, no aguados.
• Esparza los huevos cocinados sobre el pan o tortilla y cubra con queso y rebanadas de tomate.
• Sirva este sándwich abierto caliente.
Consejo: Los huevos son una fuente barata y saludable de proteína.
Información nutricional
Tamaño de la porción (con pan integral): 1 sándwich; Calorías: 230; Carbohidratos: 16 g; Fibra: 0 g; Grasas: 11 g; Grasa saturada: 3.5 g; Sodio: 320 mg
HUMMUS GOBBLER
Source: Head Start ECLCK Cooks Corner: Recipes for Healthy Snacks
INGREDIENTS
1 slice whole wheat bread
1 teaspoon hummus
1 red, yellow, and/or green bell pepper, cut into strips
1 carrot, cut into long and short sticks
1 black bean, cut in half (black olive pieces can be used as a substitute)
DIRECTIONS
1. Use a round cookie cutter to cut the bread into two 1-inch circles.
2. Spread the hummus onto one bread circle, and cover with the other circle.
3. Put the bell pepper strips around the top of the sandwich for feathers.
4. Put two long carrot sticks on the bottom of the sandwich for legs.
5. Put one short carrot stick on either side of each long carrot stick for feet.
6. Put a small piece of bread crust and a strip of bell pepper on the sandwich for the wattle.
7. Put the black bean halves on the sandwich for eyes.
Safety tip: An adult should slice the ingredients. For children ages 3 to 5, cut carrots into thin strips
PAVO DE HUMUS
INGREDIENTES
1 rebanada de pan integral
1 cucharadita de humus
1 pimiento morrón rojo, amarillo o verde, cortado en tiras
1 zanahoria, cortada en tiras largas y cortas
1 frijol negro cortado a la mitad (también se pueden usar aceitunas negras en vez de frijoles)
INSTRUCCIONES
1. Con un molde para cortar galletas redondo, corte el pan en dos círculos de 1 pulgada.
2. Unte el humus en una de las rebanadas de pan y cúbralo con el otro círculo.
3. Ponga las tiras de pimiento morrón alrededor de la parte superior del sándwich para que parezcan plumas.
4. Ponga dos tiras de zanahoria en la parte inferior del sándwich para hacer las patas.
5. Ponga una tira de zanahoria a cada lado de las tiras largas de zanahoria para que parezcan pies.
6. Ponga un pequeño trozo de costra de pan y una tira de pimiento morrón en el sándwich para las barbas.
7. Ponga las mitades de frijol negro en el sándwich para hacer los ojos.
Consejo de seguridad: Un adulto debe rebanar los ingredientes. Para niños de entre 3 y 5 años, corte las zanahorias en tiras delgadas.
RAINBOW TOAST
Courtesy of Holley Grainger
 DESCRIPTION
Channel their inner artist and foodie by making Rainbow Toast with Edible Paint. Milk, bread, coloring and creativity are all your kids need to create an edible masterpiece for a fun breakfast, snack or sandwich.
INGREDIENTS
11/2 cups milk, divided
Food coloring (red, blue, yellow)
8 slices white bread (or white wheat bread)
INSTRUCTIONS
1. Pour 1/4 cup milk into each of 6 cups.
2. Add 3 drops red coloring to one cup, 3 drops blue coloring into a second cup, 3 drops yellow coloring into a third cup, 3 drops red and 3 drops blue into a fourth cup to make purple, 3 drops red and 3 drops yellow to make orange, and 3 drops blue and 3 drops yellow to make green. Stir each cup until vibrant color appears.
3. Using a Q-tip or clean paint brush, “paint” one side of a slice of untoasted bread. Repeat with remaining bread. Once one side of bread has been painted, cook in a toaster on medium heat or in the oven at 350 degrees F for 6-8 minutes.
TOSTADA ARCOIRIS
DESCRIPCIÓN
Canalice a su artista interior y entusiasta haciendo Rainbow Toast con Edible Paint. Leche, pan, colorante y creatividad son todo lo que sus hijos necesitan para crear una obra maestra comestible para un divertido desayuno, merienda o sándwich.
INGREDIENTES
11/2 tazas de leche, dividida
Colorante alimentario (rojo, azul, amarillo)
8 rebanadas de pan blanco (o pan de trigo blanco)
INSTRUCCIONES
1. Vierta 1/4 taza de leche en cada una de las 6 tazas.
2. Agregue 3 gotas de colorante rojo a una taza, 3 gotas de colorante azul en una segunda taza, 3 gotas de colorante amarillo en una tercera taza, 3 gotas de rojo y 3 gotas de azul en una cuarta taza para hacer púrpura, 3 gotas de rojo y 3 gotas amarillo para hacer naranja, y 3 gotas azules y 3 gotas amarillas para hacer verde. Revuelva cada taza hasta que aparezca un color vibrante.
3. Usando una punta Q o un pincel limpio, “pinte” un lado de una rebanada de pan tostado. Repita con el pan restante. Una vez que se haya pintado un lado del pan, cocine en una tostadora a fuego medio o en el horno a 350 grados F durante 6-8 minutos.
FLOWER POWER EGGS IN BELL PEPPER RING MOLDS
Courtesy of Apron Strings Blog
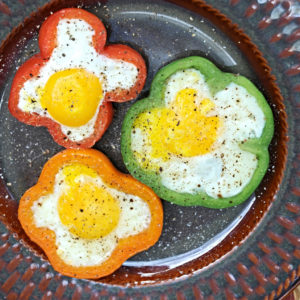 Just three steps!
1) Cut bell peppers into 1/2 inch rings
2) Place in a non-stick lightly oiled skillet
3) Crack an egg in the middle of each ring and cover and cook over low heat until done.
If you like your yolks runny, just cook over low heat until whites are done. If you like your yolks firm, break the yolks and then cook over low heat until both whites and yolks are firm.
HUEVOS DE POTENCIA FLORAL EN MOLDES DE ANILLO DE PIMIENTA
Realmente hay solo tres pasos:
1) Cortar los pimientos en aros de 1/2 pulgada;
2) Colocar en una sartén antiadherente ligeramente engrasada; y
3) Romper un huevo en el medio de cada anillo y tapar y cocinar a fuego lento hasta que esté listo.
Si le gustan las yemas, simplemente cocine a fuego lento hasta que las claras estén listas. Si le gustan las yemas firmes, rompa las yemas y luego cocine a fuego lento hasta que las claras y las yemas estén firmes.
GROW VEGETABLES FROM SCRAPS
Source: University of Massachusetts Amherst, The Center for Agriculture, Food and the Environment
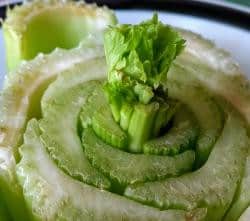 Do you have a bunch of celery in your refrigerator? Cut 2 inches from the base of the stalk and place it in a shallow bowl with water, cut side up.
Spray the top of the celery with water.
Every few days, replace the water with fresh water and watch for roots to appear. Do you see any new shoots growing from the top?
When there are roots, transplant the celery into the ground if the weather is warm enough or into a pot with potting soil. Remember to keep watering the plant.
SEMBRAR VEGETALES A PARTIR DE SOBRAS
¿Tienes un manojo de apio en el refrigerador? Corta 2 pulgadas de la base del tallo y ponlo en un bol poco profundo con agua dejando el lado del corte hacia arriba.
Riega la parte superior del tallo con agua.
Cada dos días, cambia el agua para mantenerla fresca y mira cómo las raíces em piezan a aparecer. ¿Ves algún brote nuevo por el tope?
Cuando haya raíces, trasplanta el apio al suelo si el clima es lo suficientemente cálido o a una maceta con tierra para sembrar. No olvides seguir regando la planta.
Facebook Posts
19 hours ago
19 hours ago
The Americans with Disabilities Act
www.ada.gov
Disability rights are civil rights. From voting to parking, the ADA is a law that protects people with disabilities in many areas of public life.